Install NX PCB Exchange Connect services
This procedure shows how to install NX PCB Exchange Connect services on a Windows Server 2019 Standard Edition and host them with the Internet Information Services (IIS).
Ensure that all the prerequisites are installed on the Windows server.
The NX PCB Exchange Connect services installation package services_<version>.zip contains a services folder, which should be copied on the server, for example C:\pcbExchangeCloud\services.
- From the Start menu, launch Internet Information Services (IIS) Manager.
- In the Internet Information Services (IIS) Manager window, in the Connections pane, expand the server node→Sites.
- Under the server node, right-click Sites and choose Add Website.
-
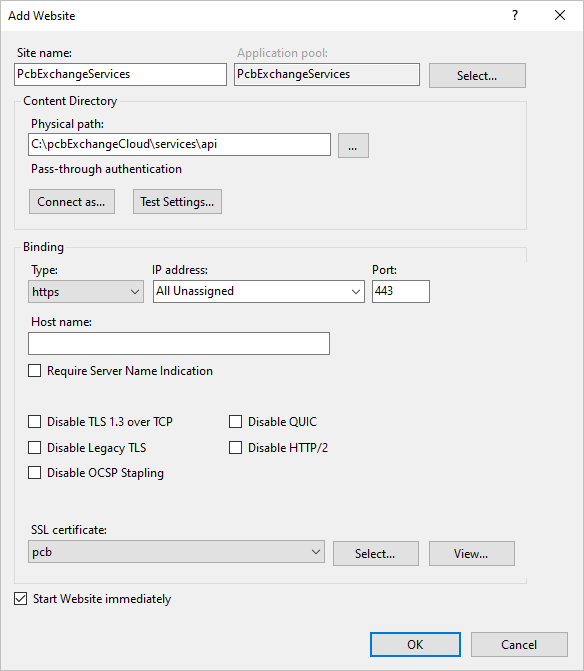
In the Add Website dialog box, enter the following information:
- Site name=PcbExchangeServices or another meaningful name
- Physical path=absolute path to the api folder, for example C:\pcbExchangeCloud\services\api
- Type=https for a secure connection
- Port=8780 or any other available port on the server

- From the SSL certificate list, select the appropriate valid SSL certificate installed by your IT team.
-
Click OK.
The PcbExchangeServices website is created in IIS and visible under Sites.
- Right-click PcbExchangeServices and choose .
-
In the Import Application Package dialog box, on the Select the Package page, click Browse, select the EMCADWeb.Api.zip file, and click Next.
The EMCADWeb.Api.zip file is provided in the NX PCB Exchange Connect installation package in the api_webDeploy folder.
- On the Select the Contents of the Package page, click Next.
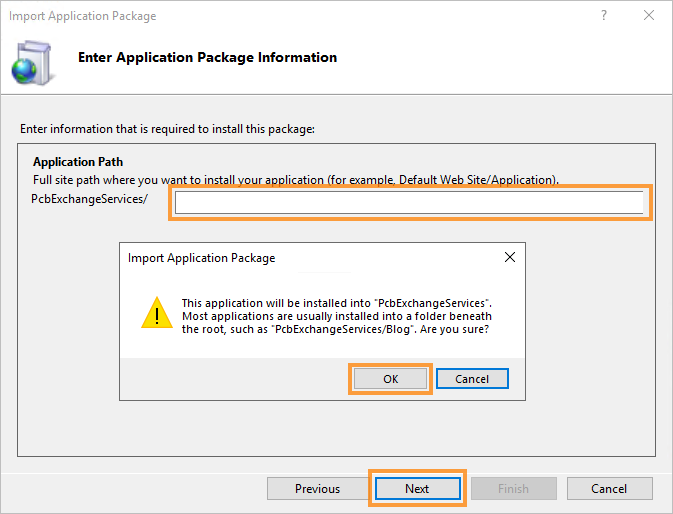
- On the Enter Application Package Information page, leave the path parameter empty and click Next.
-
Click OK to accept the displayed warning.

- Click Finish.
- In the Internet Information Services (IIS) Manager window, in the Connections pane, select Application Pools (1).
- In the Application Pools pane, select the PcbExchangeServices application pool (2).
-
In the Actions pane, click Advanced Settings (3).

-
In the Advanced Settings window, under Process Model, select the Identity parameter and click
 .
.
- In the Application Pool Identity window, select Custom account and click Set.
-
Provide a local account under which the NX PCB Exchange Connect services website will run.
It can be any account as long as the services folder permissions are properly set for that account.
- Click OK twice to close the Set Credentials and Application Pool Identity windows.
-
In the Advanced Settings window, under Process Model, set:
- Idle Time-out (minutes)=0
- Load User Profile=True
- Maximum Worker Processes=1
- Click OK to close the Advanced Settings window.
-
(Optional) To lessen the impact on production for your organization, it is recommended to specify the application pool recycling during off hours by doing the following:
- In the Actions pane, click Recycling.
- In the Recycling Conditions window, select the Specific time(s) check box and enter the start time to be something convenient for your organization.
- Click OK to close the Recycling Conditions window.
- Use File Explorer to navigate to the services parent folder.
- Right-click the services folder and choose Properties.
- In the services Properties window, select the Security tab and click Edit.
- In the Permissions for services window, click Add.
- In the Select Users or Groups window, type your application pool user name and click Check Names.
- When the user is found, click OK.
- In the Permissions for services window, select the newly added user and select the Modify check box in the Allow column.
- Click OK twice to close Permissions for services and services Properties windows.
- Define all environment variables listed in Environment variables as system variables if not already done.
- Open a command prompt as an administrator.
- When prompted to allow the app to make changes on the hard drive, click Yes.
-
In the command prompt, run
iisreset.The following should be displayed:Attempting stop... Internet services successfully stopped Attempting start... Internet services successfully restarted - In the Internet Information Services (IIS) Manager window, in the Connections pane, under Sites, select the PcbExchangeServices website.
-
In the Actions pane, in the Browse Website section, click Browse to test the website.
The NX PCB Exchange Connect services home page where you can access the API description and API health monitoring pages is displayed in the browser.

- In the browser, click the API health monitoring link to verify that everything is installed correctly.
